- I have often had people ask me about fluoride, and for good links to aid in their research. I have found myself repeatedly typing this out. So I'm posting it here for ease of use in the future. I hope you all find it helpful as well.The CDC and AMA both actually advise AGAINST routine use off fluoride:
http://articles.mercola.com/sites/articles/archive/2010/11/13/cdc-and-ada-now-advise-to-avoid-using-fluoride.aspx
This one discusses some of the history of fluoride, as well as its current use in psychiatric drugs, and its purpose in them.
http://rense.com/general3/fluo.htm
10 facts about fluoride discusses some of the most important problems with fluoridation programs.
http://www.fluoridealert.org/articles/fluoride-facts/
photos and graphs about the increase of dental fluorosis over time as fluoride programs spread.
http://www.fluoridealert.org/issues/fluorosis/
This piece gets into the chemical composition and toxicity of fluoride from a chemistry point of view.
http://www.just-think-it.com/no-f.htm
Another top 10 dangers of fluoride, but I like this one especially because it has a listing of foods that have hidden fluoride (which will help you understand why the danger of over-fluoridation is so high).
http://www.cheeseslave.com/top-10-dangers-of-fluoride/
In this 1998 interview, Dr. John Colquhoun explains why he went from being New Zealand’s leading promoter of fluoridation to being an opponent of the practice.
http://www.fluoridealert.org/fan-tv/colquhoun/
Abby Martin takes with a look at the 50 year long practice of water fluoridation in America, outlining adverse health effects and breaking the myth that it helps prevent tooth decay.
http://www.youtube.com/watch?v=aqQkqZKBuV4&feature=youtu.be
Russell Blaylock M.D., a neurosurgeon discusses the toxic consequences of fluoridation
http://www.youtube.com/watch?v=zvA-Ph-L0io&feature=youtu.be
Discusses the differences between naturally occurring fluoride and the byproduct being added to products and water as fluoride.
http://www.youtube.com/watch?v=gAg8saQWhiI
I like this on for the list of non-food products that use fluoride.
http://www.knowthelies.com/node/3519
Fox news's report on the EPA reversal stance on fluoride use.
http://www.foxnews.com/health/2011/02/22/epa-reverses-fluoride/
Thursday, June 13, 2013
Fluoride links list

Sunday, May 26, 2013
Black Salve
1 T of dried calendula, 1 T dried comfrey, 1 T. dried chamomile, and 1/2 c. olive/apricot kernel oil. Infuse the oil with the dried herbs. Then use 2-3 T of this oil, along with
2 tablespoons shea butter, 2 Tablespoons of coconut oil, 2 Tablespoons Beeswax,1 teaspoon Vitamin E oil, 2 tablespoons Activated Charcoal Powder,2 Tablespoons rhassoul Clay, 1 Tablespoon manuka honey, and 20 drops (or more) Lavender Essential Oil. Melt the beeswax, shea butter, and coconut oil in a double boiler. once melted, remove from heat and mix in remaining ingredients except for the essential oil. Let cool slightly then mix in the lavender e.o. and place into clean jars and store until needed.
Recipe written by J. Lindsey Morgan
2 tablespoons shea butter, 2 Tablespoons of coconut oil, 2 Tablespoons Beeswax,1 teaspoon Vitamin E oil, 2 tablespoons Activated Charcoal Powder,2 Tablespoons rhassoul Clay, 1 Tablespoon manuka honey, and 20 drops (or more) Lavender Essential Oil. Melt the beeswax, shea butter, and coconut oil in a double boiler. once melted, remove from heat and mix in remaining ingredients except for the essential oil. Let cool slightly then mix in the lavender e.o. and place into clean jars and store until needed.
Recipe written by J. Lindsey Morgan
Tuesday, April 23, 2013
Me? I Want A Hula Hoop
I spend a lot of time outdoors in the spring and summer with the kids and I'd been looking for a good way to exercise while they play in the yard when I stumbled upon this youtube video of a girl hula hooping, and appearing to have a great time while doing it. As I stared in amazement I wondered HOW she did it. I mean, I've never been able to keep a hula hoop up and moving. I remembered a friend of mine having talked about making hula hoops so I got chatting with her about it, and soon found that the key to hula hooping was in having a decent hoop to work with rather than one of those cheap light-weight hoops from department store toy sections.
After a trip to her house, and some test drives of her hand made hoops over coffee and laughs she gave me the low down on how to make my own usable hula hoops. After acquiring all the materials we needed we spent yesterday afternoon making our own, so I'll share with you our experience.
First you want to get your materials together.
We got our irrigation hose ($17.47), as well as our couplers ($.38/each) at Lowe's. Those are the two necessities, but we also found a few huge spools of ribbon, and some black electrical tape at our local discount store, Marden's, for really cheap to decorate our hoops with.
My hula hoop making friend told me to use a hack saw to cut the tubing and a bowl of hot water to soften the plastic before coupling it, but out here in the woods we tend to amp things up a bit so my welder neighbor lent me his skill saw and my landscaper boyfriend gave me his torch (apparently that's what they use when they are installing irrigation systems, go figure).
If you've read my blog before you already know I'm not really big on measurements, so I eyeballed the circumference I wanted for my hula hoop and cutting that length of tubing. We also decided to weight some of the hula hoops by adding water (somewhere between a half a cup and a cup) to the tubing before coupling the two ends together.
After adding the water we heated the tubing up using the torch, when it made the plastic shiny that indicated it was soft and pliable enough to couple together easily.
Once the plastic had been heated we slid the coupler into one end of the tubing, and then the other, completing the circle. As you can see from the photo, my cut wasn't very clean and left a gap when coupled together. We remedied this with the black electrical tape we had to make it a smooth connection. Once the plastic cools it tightens back up on the coupler, sealing it tightly.
After completing the hula hoops we decorated a few of them (and we still have some waiting to be decorated) with the ribbon we got on sale. We taped one end near the coupling and spiraled tightly around the tubing until the ends met up, and then took an alternating color and did the same thing in the gaps naturally created in the spiraled ribbon on the tubing which gave the appearance of alternating colors on the edge of the hoop. I also took the electrical tape and spiraled it around between the ribbons so it held down every other edge (though I could have done twice and gotten every edge) which seems secure and hasn't loosened even though we played with the hoops all yesterday and today.
And, just as a warning.....if you happen to be knee high to a grasshopper, and your face is right at the same height as mama's waist, DON'T do sneaking up on her while she is attempting to hula hoop because this is what happens.....
I hope you enjoyed our little adventure creating out own hoops. Let us know if you try it out too.
After a trip to her house, and some test drives of her hand made hoops over coffee and laughs she gave me the low down on how to make my own usable hula hoops. After acquiring all the materials we needed we spent yesterday afternoon making our own, so I'll share with you our experience.
First you want to get your materials together.
We got our irrigation hose ($17.47), as well as our couplers ($.38/each) at Lowe's. Those are the two necessities, but we also found a few huge spools of ribbon, and some black electrical tape at our local discount store, Marden's, for really cheap to decorate our hoops with.
 |
| 100ft. 3/4 in irrigation tubing |
 |
| 3/4 in tubing couplers |
 |
| Skill saw and torch to cut and soften the plastic |
 |
| adding water to the tubing (can you tell the toddler is begging to let him do this job?) |
After adding the water we heated the tubing up using the torch, when it made the plastic shiny that indicated it was soft and pliable enough to couple together easily.
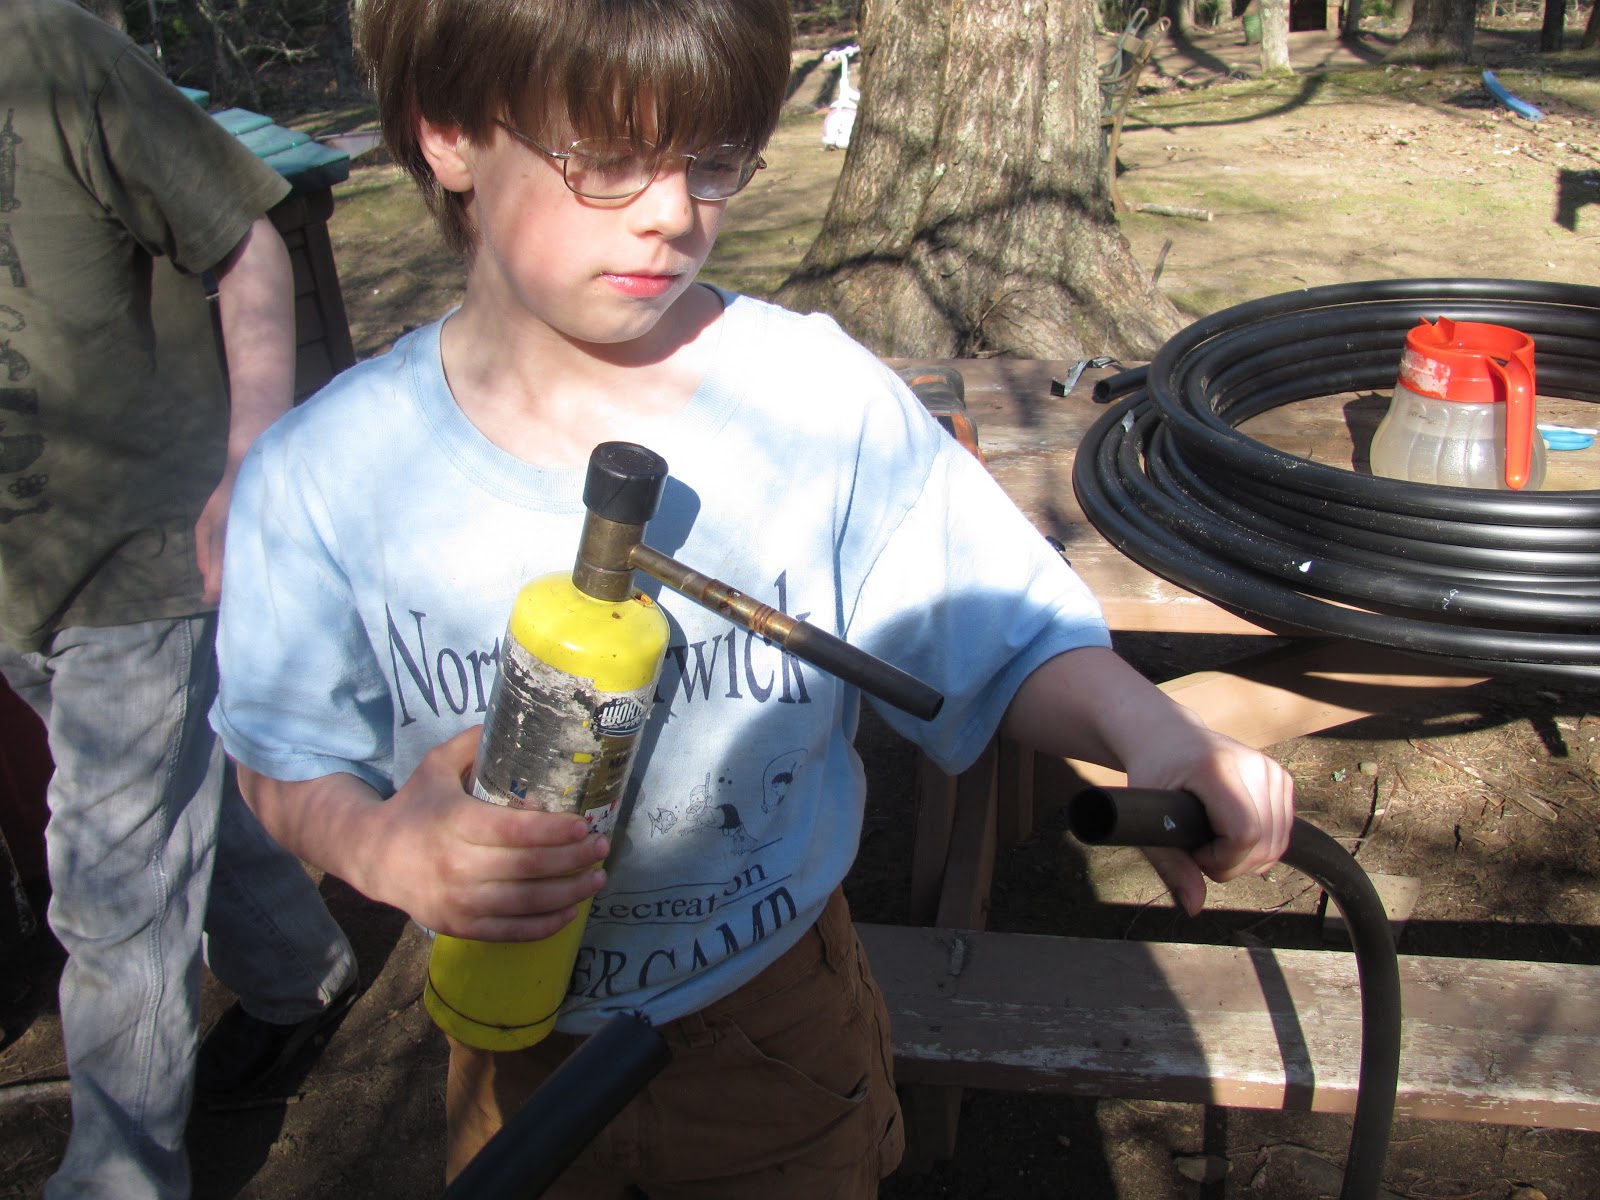 |
| my little man demonstrating how and where to use the blow torch (no worried, the torch was OFF for demonstration purposes). |
Once the plastic had been heated we slid the coupler into one end of the tubing, and then the other, completing the circle. As you can see from the photo, my cut wasn't very clean and left a gap when coupled together. We remedied this with the black electrical tape we had to make it a smooth connection. Once the plastic cools it tightens back up on the coupler, sealing it tightly.
 |
| the coupled tubing |
 |
| ribbon and electrical tape pattern on tubing |
 |
| Thing 1 showing off the completed project |
 |
| Add caption |
 |
| giving it a whirl |
 |
| practicing some new moves |
 |
| The boys showing off their new creations. |
 |
Don't let the tears fool you, he was already finished crying, he just started up again when he realized I was making him come inside (big surprise, this is the little Heffalump that wakes up screaming "ME GOOOOOO OOOUUUTTT!!!!")
|
Friday, March 29, 2013
BREAKFAST COOKIES
Recipe by a very sweet facebook friend :)
1 cup dry oatmeal (not steel cut, not instant)
1/2 cup chocolate chips
1/2 cup peanut butter
1/2 cup flax or hemp seed
1/3 cup of honey
1 tsp vanilla
Mix it up, roll it into little balls and serve. I use a little coconut flour on my hands to keep it from sticking as I make the balls. But recently I bought a gadget from Pampered Chef. It's a chip clip but both ends have scoops, one large and one small. So next time I'm trying that scoop to make the balls.
I copied and pasted her directions here so I don't loose it, and can try it out. I'll take photos to post, and if I make any adjustments I will note them later as well. I'm kind of already thinking these would be yummy with a dried fruit of some sort as well, like raisins or cranberries :)
Sunday, March 10, 2013
Microwave chocolate cake
Reposting a microwave cake recipe from Jennifer Blyth so I don't lose the recipe:
Microwave chocolate cake... the most dangerous recipe EVAR!
4 tbsp flour
4 tbsp sugar
2 tbsp unsweetened cocoa
1 whisked egg
3 tbsp milk
3 tbsp chocolate chips
1 tsp Vanilla
microwave on high for 3 minutes.
Microwave chocolate cake... the most dangerous recipe EVAR!
4 tbsp flour
4 tbsp sugar
2 tbsp unsweetened cocoa
1 whisked egg
3 tbsp milk
3 tbsp chocolate chips
1 tsp Vanilla
microwave on high for 3 minutes.
Thursday, January 31, 2013
In the beginning - Vaccine Injury
Yes, I believe my son, Thing 2, was injured by vaccines.
I had a flu shot when I was preggo with him, I got so sick I thought I was just going to stop breathing and die. Then he was born shrieking. Didn't realize it could be a vaccine reaction. I kept vaccinating until he was two. At that point a child psychiatrist suggested we medicate and give him Ritalin. Now, I've known people with addiction problems with Ritalin and Adderall, and I didn't want to see him go through that, so that's where my journey looking into natural alternatives started.
I wound up in school for homeopathy. Thing 2 had gotten so bad he was headbanging, escaping the house (we had to put alarms on the windows and doors), he'd run if we were in public and get lost (this is why those dreams were so horrific to me, I know what its like to lose my kid), and the repetitive phrases, night terrors, inappropriate behaviors, the extreme meltdowns etc. I didn't know they were symptoms of autism, because he was so smart, and my mental picture of autism was not aligning with that.
Then when I learned more and started treating him, I realized that the remedies I was using were for vaccine injury. So I started looking at the package inserts and side effects, and it all became very clear to me. He was suffering, and all along I had been treating him like he was acting out, like he was a bad/high needs kid.
I realized in the process that my older son, Thing 1, was suffering from chronic ear infections (which lead to ear tubes, and worse infections) and lung problems (asthma and chronic bronchitis), childhood arthritis, and even hearing voices because of toxic overload from vaccines. His last set of shots that I allowed included varicella, within a week he was missing school because he broke out in a rash. He had chicken pox. He healed quickly, and within a month he had it again. There were no reports of anyone else in his school having chicken pox.
I had MY last vaccine at the beginning of going to school for homeopathy, I was 25. The doctor thought it was a great idea for me to get the pneumonia vax. The next day I had a lump in my arm and couldn't even move it, the pain was so disproportionately huge. Turned out that vaccine had given me a blood clot, that could have killed me, just so I wouldn't get pneumonia. I was pissed. I was more pissed that she denied it could be from the shot, when the damn blood clot was right at the injection site. AND she refused to report it. Of course, back then I had no clue that I could report it myself, and she didn't offer up that info.
It kind of all came together at once for me, the depth of this farce, because of all those factors. Those are the reasons I speak out so strongly against vaccines. I never got Thing 1 diagnosed. I was so pissed off at doctors I didn't want the label, or their input anymore. Decided just to deal with it on our own. The only problem with that is he doesn't get any services, but I'm not sure they would help him anyway...and it has the added bonus of not having the diagnosis to haunt him in the future.
I had a flu shot when I was preggo with him, I got so sick I thought I was just going to stop breathing and die. Then he was born shrieking. Didn't realize it could be a vaccine reaction. I kept vaccinating until he was two. At that point a child psychiatrist suggested we medicate and give him Ritalin. Now, I've known people with addiction problems with Ritalin and Adderall, and I didn't want to see him go through that, so that's where my journey looking into natural alternatives started.
I wound up in school for homeopathy. Thing 2 had gotten so bad he was headbanging, escaping the house (we had to put alarms on the windows and doors), he'd run if we were in public and get lost (this is why those dreams were so horrific to me, I know what its like to lose my kid), and the repetitive phrases, night terrors, inappropriate behaviors, the extreme meltdowns etc. I didn't know they were symptoms of autism, because he was so smart, and my mental picture of autism was not aligning with that.
Then when I learned more and started treating him, I realized that the remedies I was using were for vaccine injury. So I started looking at the package inserts and side effects, and it all became very clear to me. He was suffering, and all along I had been treating him like he was acting out, like he was a bad/high needs kid.
I realized in the process that my older son, Thing 1, was suffering from chronic ear infections (which lead to ear tubes, and worse infections) and lung problems (asthma and chronic bronchitis), childhood arthritis, and even hearing voices because of toxic overload from vaccines. His last set of shots that I allowed included varicella, within a week he was missing school because he broke out in a rash. He had chicken pox. He healed quickly, and within a month he had it again. There were no reports of anyone else in his school having chicken pox.
I had MY last vaccine at the beginning of going to school for homeopathy, I was 25. The doctor thought it was a great idea for me to get the pneumonia vax. The next day I had a lump in my arm and couldn't even move it, the pain was so disproportionately huge. Turned out that vaccine had given me a blood clot, that could have killed me, just so I wouldn't get pneumonia. I was pissed. I was more pissed that she denied it could be from the shot, when the damn blood clot was right at the injection site. AND she refused to report it. Of course, back then I had no clue that I could report it myself, and she didn't offer up that info.
It kind of all came together at once for me, the depth of this farce, because of all those factors. Those are the reasons I speak out so strongly against vaccines. I never got Thing 1 diagnosed. I was so pissed off at doctors I didn't want the label, or their input anymore. Decided just to deal with it on our own. The only problem with that is he doesn't get any services, but I'm not sure they would help him anyway...and it has the added bonus of not having the diagnosis to haunt him in the future.
Wednesday, January 30, 2013
Dinner recipes - Chicken Elaine
My family loves this recipe (even the super picky one), it only takes a few minutes to throw together, so works super good if we have been busy all day, and I'm trying to multitask while making dinner.
2 or 3 chicken breasts (sliced into thinner pieces)
1 can or box of condensed cream of mushroom soup
1 can or box worth of milk (to mix with the cream of mushroom)
8 oz of sliced swiss cheese
whatever rice you like (we use basmati)
Preheat the oven to 350 degrees.
In a large casserole dish, mix the cream of mushroom and milk well.
Place chicken pieces in a single layer, into the soup mixture (the mixture should cover the tops of the chicken pieces).
Then layer the swiss cheese on the top.
Throw in the oven and bake for 30 - 45 minutes (just until the chicken is done, and the cheese is starting to brown a bit).
The soupy sauce thickens up a bit if you leave it out for a few minutes before serving.
Serve over rice.
**Will have to add a photo later, since there aren't even left overs tonight :)
2 or 3 chicken breasts (sliced into thinner pieces)
1 can or box of condensed cream of mushroom soup
1 can or box worth of milk (to mix with the cream of mushroom)
8 oz of sliced swiss cheese
whatever rice you like (we use basmati)
Preheat the oven to 350 degrees.
In a large casserole dish, mix the cream of mushroom and milk well.
Place chicken pieces in a single layer, into the soup mixture (the mixture should cover the tops of the chicken pieces).
Then layer the swiss cheese on the top.
Throw in the oven and bake for 30 - 45 minutes (just until the chicken is done, and the cheese is starting to brown a bit).
The soupy sauce thickens up a bit if you leave it out for a few minutes before serving.
Serve over rice.
**Will have to add a photo later, since there aren't even left overs tonight :)
Subscribe to:
Posts (Atom)